Showing posts with label ST6. Show all posts

Assembling a Wired Stumpwork Flower

A couple of days ago I posted a tutorial on creating wired needlelace elements for stumpwork, which you can use for flowers, leaves, insect wings and several other things.  Now it's time to fasten the detached elements to the main fabric and complete the motif.

This is the piece I was working on, the now deleted (waaah!) DMC Stumpwork kit 'Poppy and Beetle'.  Those of you who've been following this project will notice that I re-worked the bud to the original design after all!!  Anyway, the poppy was the only part left to complete and you can see where it's to be located, top left..


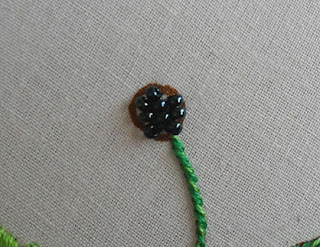
The first thing to do was to as near as fill that oval shape with beads as the supplies in the kit allowed.  The instructions actually suggested you do this after attaching the petals, but there were two reasons why I decided to work it the other way around: 1) I think it would be very hard to attach or stitch anything when there are going to be a lot of wire ends from the petals in the way on the back; and 2) One can never be sure that the beads provided would fill the space and, if the petals were already in place, then there could be a gap and/or pattern lines showing.  Yikes!  So, beads came first and were attached with one strand of black thread and a beading needle.


Here you can see me preparing the holes for the third petal.  Using a thick needle, such as a chenille type, punch a couple of holes where you want the wires to go through.  I did this as close to the beading as reasonably possible so that printed pattern lines weren't visible afterwards (I can't tell you how much I hate being able to see that sort of thing on a finished piece, it SO spoils it!)


When the holes are ready, poke the free ends of the wires through and pull them from the back so that the petal (or wing, or leaf etc) sits on the fabric.  Don't concern yourself with the angle it sits at just yet.


When all the detached elements are in place, turn the work over and pull them through as far as you can.  Then bend the wires to stop them from going back through again and trim off some of the excess using wire cutters or goldwork scissors (anything toughened, but NOT your regular embroidery pair!)


Using the black thread I still had attached from the beading, I secured the wires to the back of the fabric by weaving it around the wires and taking it through the back of whatever stitches I could.  Whatever you do, take care not to allow the securing stitching to show on the front (which is possibly what motivated DMC to suggest doing this before the beading, but you can see how easy it would be to attach beads through this lot, right?)  Trim the wires as much as you can, but leave enough to make sure they're secured.


Turning back to the front and you can now arrange the petals in any way you like.  The wire bends easily, so it won't be too hard to have them at any angle you choose.


I hope that was helpful and that it's inspired you to have a go at wiring a flower or something similar. If you do, please leave me a link to see your work.  It's rather hard finding blogs of active stumpworkers!

Here's the final piece, the bottom photo of which surprised and delighted me by remaining at number one on the Stitchin' Fingers content and photos leaderbeards for a couple of days!


I still have two more of these kits (see the 'Stumpwork page for the first two that I worked - 'Bee' and 'Ladybird'), which are 'Dragonfly' and 'Butterfly', so look out for those coming soon!

© Elizabeth Braun 2012

Wired Needlelace Elements for Stumpwork

Whilst I was working the stumpwork poppy recently, I took some photos of the technique for one of the petals, which I thought may be of interest to anyone who wants to know how to create a wired element for a stumpwork piece using needlelace.  (I'll do a fabric based one later on.)

The first step is to create a wire outline for your selected shape.  In this case, I had the printed guide in the kit to help me, but you could also be working from something in a magazine, book or even your own drawing.  Naturally, it needs to be the exact size and you simply bend the wire to fit.  It doesn't have to be too exact a fit at this stage.  Stumpwork wire bends very easily too, so no special tools are needed.


The next stage is to couch the wire shape to a needlelace pad.  You make this pad yourself by folding a rectangular piece of fabric (here, lightweight calico is used) and tacking along the edge opposite the fold.  You will need two layers.  Couch the shape in place and at this point you will need to be as exact as you can manage in getting your shape correct.  It was easy for me at this point in the process as I could still see the impression of the shape from where I'd worked the first three petals.


Fasten on a length of thread by simply taking the needle under the couching stitches along one side of the shape.  Don't worry about any ends as they will be taken in later on.  Take the thread under the wire and into the shape and begin to fill in with your chosen stitch (in this case, detached buttonhole stitch) using the wire itself as the anchor for the first row.


Continue until the first row is done and, oh, don't pull these stitches too tight or work them too close together. When you get to the end of the row, take the needle back under the wire and then start the next row taking it over the wire back into the shape.


Anchor future rows onto existing stitches and keep on going until you run short on thread (or finish the shape, whichever is sooner!!).  It's good to use fairly long pieces of thread for this type of work, but that depends on how durable your thread is.  If you're working with a more delicate thread, such as silk or a metallic, then you'll need to take that into account.


When you come to the end of your piece of thread, anchor it off in much the same way you started the piece by running it under the couching stitches and along the stitches at the side of the shape.


Fasten on a new piece in the same way and continue working the filling stitch until you can't reasonably get any more stitches into it.


When your shape is full, then begin to work close buttonhole stitches all the way around the outside of the shape completely covering the wire and taking in any lose fastening on and off threads.  Fasten it off finally by hiding the thread as best you can among the stitches wherever there is a reasonable space that will not show.


Your shape is now complete, but still couched to the pad.  So, now snip away the tacking stitches holding the pad together and pull the two layers apart as much as you can to reveal the couching stitches between them.  Snip through some of these and pull them out.


Your shape should now come away cleanly in your hands and all you need do it pull out any odd couching threads (using a contrasting colour couching thread can make this much easier to do).


This method can be used with a variety of shapes as you can see here from a photo I took whilst working on the stumpwork bee wings a couple of years ago.  In this case, the filling stitch was working around in an almost complete oval along the wires and then just pulled together with a suitable stitch or two in the middle.


I hope this has given some insight into how these detached elements are made and has been helpful!  See the next post for how to assemble a wired flower!

© Elizabeth Braun 2012

TAST Week Two and so on...

If you were one of the many kind readers who enjoyed and commented nicely on the last TAST posting, then I'm afraid that today's may prove rather a disappointment as I've only done the doodle-pad this week.  So, to answer your question, Cynthia, no, I won't be doing a picture every week.  I'll just do them when I feel sufficiently inspired and I have the time and umph.=)  I do plan to do the stitches themselves each week, but will be happy with doing about half in some sort of pictorial form (which I plan to  make a sort of portfolio affair of, or may even mount some into cards etc).  At the moment, I have a number of gifts I want to make and other things to do, so I decided against the blanket stitch based picture.  To be honest, I wasn't really excited enough about it anyway, even though I found a good few variations, as you can see here.

So, here are samples of plain blanket stitch, double blanket stitch, knotted blanket stitch, what would have been a blanket stitch pinwheel had it not been worked on Aida and therefore turned into a blanket stitch diamond (which I liked a fair bit and felt had some potential in counted work), long and short blanket stitch and a raised blanket stitch bar, which was rather rushed off and so didn't really cover the threads it was stitched over very well.  Why blanket and not buttonhole?  Well, in the form buttonhole was introduced on Pintangle, it's exactly the same, but there is a traditional buttonhole stitch which is actually somewhat different, so I chose to be pedantic!!=)

One of the first of the other things I need to do stitch-wise is a 'thank you' card for friends who gave us a most unexpected gift the other day.  So, I fished out this old magazine freebie kit that I'd part-worked to finish off and got on with that a bit yesterday.  I also want to do a cross stitched bookmark for another friend and, after that, a nice cushion cover for the couple the card is for.  I'd planned something like that anyway and now I feel I have good impetus to do it.  I also want to get the dogrose made up into its final form and get that needlepoint giraffe sorted as well.  So, there are many projects clamouring for my attention and that means that it's not likely that TAST will be a major priority as far as really taking it as far as it goes each week goes.

And what do you think of these fellows?


These are for a magazine - 'Crazy Quilt Gatherings' Issue 4 - and the tutorial that was requested will be just for the central, larger red ladybird, but with instructions at the end for the other variations.  You can find out more about the mag and order a copy when I can find where the editor has hidden the info I got from her site before (LOL!!!), but I will be reserving rights to re-publish the tute on my blog, which I plan to do in the summer.  So, that's something coming up later on.

In the meantime, I have stacks of photos to chose and edit ready for that tute, plus one on general wired needlelace elements for stumpwork (yes, using a poppy petal from my recent project), then the assembling of the poppy itself along with the finished piece.  And that's before I even start on....

Yes, I'm feeling busy again!

© Elizabeth Braun 2012

Stumpwork Beetle

I completed the stumpwork beetle yesterday afternoon and, whilst I think I need more practice, I'll share with you how it was done here.  Hope you enjoy and find it at least a little interesting, and maybe even useful too!

The kit came with just an oval outline on the fabric.  The first thing to do then, was to pad the outline with felt.  There was no pattern given for it, so I just guess-timated and then trimmed to size.  Then you stab stitch it in place.  No need for lots of stitches, just a few are OK.  You could even just put a few stitches in the centre of the felt and that would be fine too, but I prefer to have the edges secured so they don't get in my way when I'm working the next part.

The next step is to work satin stitches all across the body, completely covering the felt shape.  Here you can see me working with three strands instead of the prescribed two again.  No need to worry about covering outlines here, but it both saved needlestrokes and may even add to the height of the whole element.


The next photo shows the next two stages.  First, five stitches were made from 'toe to head', fanning out at the bottom, but going into the same hole at the head.  It's rather hard to photograph well, both lines of stitching being black, but I think you can just make it out here.  After that, re-thread the needle with two strands of metallic green floss and put a few satin stitches over the front to form a head.


Next we move on the green wings and, as you can see in this shot, the satin stitches are worked from top to bottom, along the diagonal line formed by the five black stitches.  You need to close them up slightly at the head end to both fit them all on and to stop them slipping off the side of the body.


Here you can see the completed satin stitches.


The next element is the legs and antennae.  These were worked in just one strand of black stranded cotton and done in straight stitches and detached chain (lazy daisy), thus making the 'double' look of the first section of each leg.  The antennae, of course, are just one straight stitch each coming out from the front of head (where else???!)


Finally, just stitch the eyes, two blue- or green-black seed beads, on to the front of the head and here he is, your stumpwork beetle!


I do apologise for the slightly blurry quality of one or two of the photos, but he's quite a simple little fellow and I'm sure you can find the materials for him easily, if not from the stash you already have.  The green thread is the dark green one from the DMC Light Effects range and I daresay Kreinik will also have something that answers.

© Elizabeth Braun 2011

Flatwork on the DMC Poppy and Beetle Kit

I decided to make a start today on the small stumpwork kit I posted in my last.  It's one of the six kits that DMC used to make, but has long been off the market.  I bought five of them, two of which came from a discount seller on e-bay who'd clearly got hold of a lot of end of line kits to sell on.  They do still crop up on e-bay from time to time, for anyone whose interested.

I like kits as a general rule and feel a good deal more relaxed when working one than I do when working my own design.  It's the security of having full instructions, and even some illustrations, that makes the difference, I think.  There are kits and kits though, and this is definitely of the mass produced, cheap and (usually) cheerful type.  The things I dislike most are the thin, cheap looking pieces of calico you're given to work your piece on and the fact that pattern lines are printed so thickly onto it.  I decided to work the stem stitch part in three strands as opposed to the recommended two just so as to have some hope of full coverage!  It didn't quite work, but it's near enough for what I'm thinking of as more or less a practice/learning piece.

The large leaf presented a slight challenge in that you're expected to stitch at an angle.  As you can see here, I drew in the centre vein and some angle stitch guidelines to help.  Outlining in stem stitch wasn't part of the instructions, but I feel that doing this both helps make sure you cover the printed lines and also raises the edge of the stitches somewhat.

The bud was a point of interest too.  I felt that the way it was done on the model in the photo looked rather bad, to say nothing of probably not very lifelike, so I changed it.  Here you can see the process of doing one part, the under sepal, in one layer of satin stitch, part of which provided padding for the top layer.  I'm not sure I'm wholly impressed with the final result of it. In fact, I'm wondering if it's any better than the original!  Still, this is a learning process....


Here's the status at the moment of the whole piece with all the flatwork completed.  It didn't take very long to do, especially as there's just one large leaf as opposed to the several small ones on the last DMC kit I worked. If all goes according to plan, tomorrow I hope to get to the green and black beetle and, if possible, make a start on the detached poppy petals.  See you then!


© Elizabeth Braun 2011
Older Post ►
 

Copyright 2011 sew 4 love is proudly powered by blogger.com